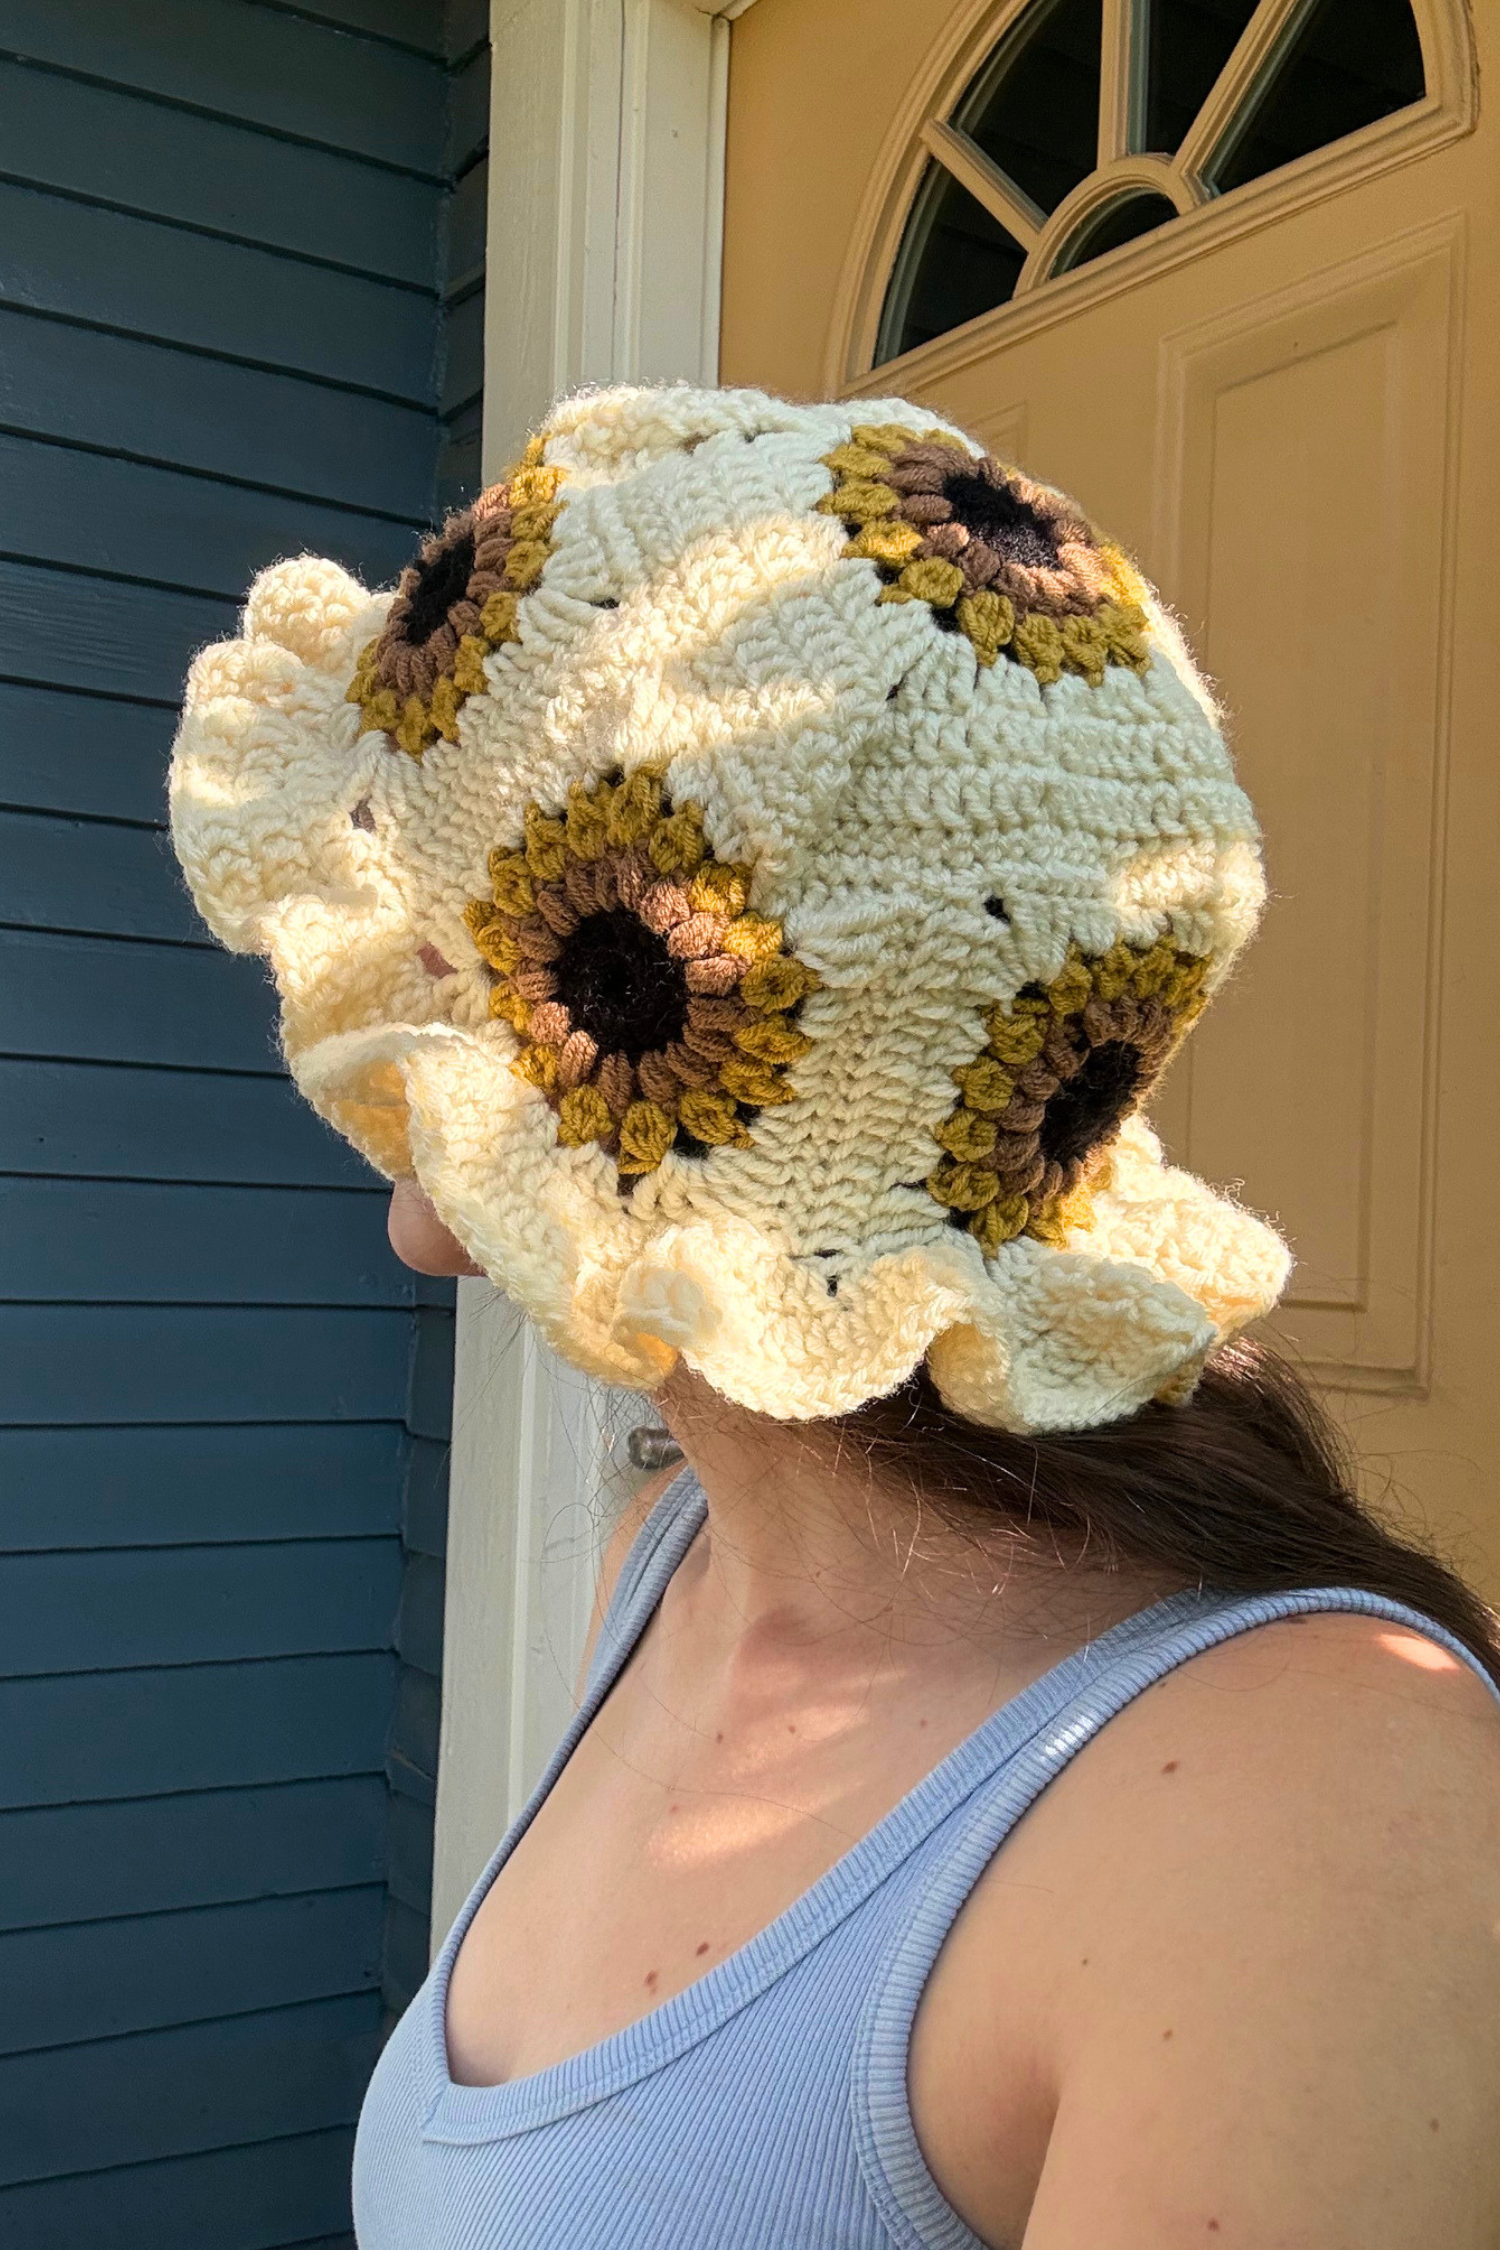
Sunny Days Set — FREE Crochet Pattern for Matching Sunflower Bucket Hat, Cat Hat, and Accessory Holder


Hi friends!
This post is all about the Sunny Days Set — and it includes the written instructions for FREE!
Before we start, here are a few links for you:
The PDF version (with step-by-step photos) is available on:
This design is now available as a kit with Lion Brand! Includes all the yarn you need & a FREE copy of the pattern.
For any questions about this pattern, please email me at sspstitches@gmail.com — I usually respond within 24 hours!
Get my new book, Crochet Retro Blankets in One Week: 40 Beginner-Friendly Projects for Cozy Throws & Matching Pillows, here! NOTE: This book does not contain the Sunny Days Set pattern; for a list of the patterns it does contain, click here.
This post contains affiliate links. This means, should you make a purchase, I will receive a small portion of the sale at no extra cost to you. All opinions are my own.
There will be a little more info about the pattern before we dive into the instructions, just so you’re fully informed before beginning! As always, if you have any questions, please email me at sspstitches@gmail.com — I’m more than happy to answer!
Happy crocheting <3
About
The Sunny Days Set includes three designs: a sunflower bucket hat made with customized sizing, a matching cat hat, and an accessory holder that’s the perfect size for your sunglasses, phone, or a small water bottle.
I’m so excited to see all the summer days made better with these cute accessories! The Lion Brand kit includes all the yarn you need and the PDF version of the bucket hat & accessory holder pattern; email me to get the PDF including the matching cat hat.
Let’s begin!
Sizing
The hat is made to your custom measurements. The standard accessory holder is 4.5” (11.5cm) wide and 9.5” (24cm) long. The cat hat is made for a medium-size cat’s head.
Materials
Hook: 5mm or size needed to obtain gauge
Notions:
Tapestry needle
Scissors
Tape measurer
Yarn: Worsted weight/size 4 yarn in 4 colors
Colors:
Color 1 is the center of the square; I used black.
Color 2 is thesecond round of the square; I used brown.
Color 3 is the third round of the square; I used yellow.
Color 4 is the main color; I used an off-white cream.
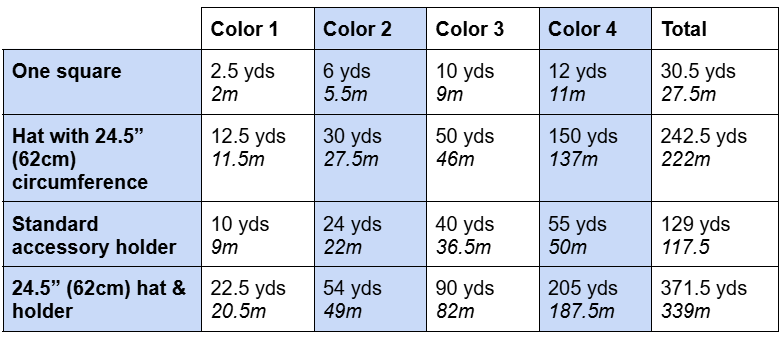
The cat hat, made for a medium-size cat’s head, requires 1 yard (1m) of color 2, 2 yards (2m) of color 3, and 35 (32m) yards of color 4.
I used Lion Brand Vanna’s Choice and Color Theory to make this; you can buy all the yarn you need in one kit here. I recommend using a similar acrylic or wool for your own project; you can find good substitutes on yarnsub.com.
Gauge
For a patchwork pattern like this, the size of the squares is the most important part of meeting gauge. If the square is 4.5 x 4.5" (11.5 x 11.5 cm), you're good to go!
To fix a loose gauge (square is too large), size your hook down. To fix a tight gauge (square is too small), size your hook up.
Pattern Notes
Skill Level: Beginner/Advanced Beginner
Sizing: The hat design uses customized sizing to fit it perfectly to your head circumference. The accessory holder and cat hat are set sizes.
Construction: The adult hat and accessory holder use granny squares sewn together as the base of the project, with finishing details added on later using basic stitches. The cat hat is made in continuous rounds with no sewing needed.
Abbreviations
ch: chain
ch1sp: chain 1 space
ch2sp: chain 2 space
dc: double crochet
dc4tog: double crochet 4 together
hdc: half-double crochet
sc: single crochet
sc3tog: single crochet 3 together
slst: slip stitch
st/sts: stitch/stitches
tc: triple crochet
yo: yarn over
Pattern Instructions
THE BUCKET HAT
Step 1: Determining Your Size
Adults can wear a hat anywhere from 21” to 25” (53 to 67 cm) in circumference. To figure out the best size for you, measure your head using a tape measurer. Place it around your head, around half an inch (1cm) above your ears, sitting in the middle of your forehead or a bit higher, depending on where you want the hat to sit.
You’ll want the hat’s circumference to be within 1” (2.5cm) of this measurement. If you like your hats snug, make it at or below that measurement. If you want it looser, make it above that measurement. Take note of the measurement you want.
When making the hat, the circumference is decided by the ring of squares you make (see “The Ring”). My sample hat used 5 squares measuring 4.5” (11.5cm) each for the ring, then added a row of dc (measuring about half an inch (1cm) each) on one side of each square before stitching them together to reach 24.5” (62cm).
Here’s how to adjust to your size:
To make a hat below 22.5” (57cm), you will need four squares. These four squares will only bring you to 18” (46cm), so you’ll need to add some extra circumference by adding one or multiple rows of dc to the side of each square in “The Ring” section.
Each row of dc adds approximately half an inch (1cm). For example, for a 20” (51cm) hat, you will need to add four rows of dc. Since you have four squares, you will add one row of dc to each square.
To make a hat 22.5” (57cm) in circumference, you will need five squares exactly, and not need to add any rows of dc between the squares in “The Ring” section.
To make a hat above 22.5” (57cm), you will need five squares. These squares will only bring you to 22.5” (57cm), so you’ll need to add some extra circumference by adding one or multiple rows of dc to the side of each square in “The Ring” section. For example, for a 23.5” hat, you will need to add one row of dc to two squares.
Note: Don’t be afraid to add different amounts of dc rows to different squares! You may think that it’ll look wonky, but it’ll be fine; no one is looking at all sides of your head at the same time.
Take note of how many squares you’ll need, and how many rows of dc you’ll need to add to the squares.
Let’s begin!
Step 2: The Square
This is a starburst granny square. If you already know how to make it, go ahead!
with color 1, ch 4, slst into first ch, ch 2 (counts as first dc)
dc 15 into center (total of 16 sts including initial ch 2)
with color 2, slst into first dc (the initial ch 2)
ch 2, yo, insert your hook back into the same stitch & pull up a loop to the height of your hook
YO & pull up a loop two more times until you have 7 loops on your hook, then YO & pull through all 7 loops and ch 1; this is the puff stitch
put a puff stitch (7 loops pulled to hook height, yo & pull through, ch1) in each dc around (16 puff sts total)
with color 3, after your final ch1, slst into the top of your first puff stitch
ch 2, yo, insert hook into first ch 1 space, pull up a loop, pull yarn through 2 loops as if to dc
yo, pull up a loop, and pull through 2 loops 3 more times, then yo & pull through all 5 loops on hook and ch 2; that is dc4tog
dc4tog & ch 2 in each ch 1 space all the way around; after your final ch 2, with color 4, slst into the top of your first dc4tog
ch 2 (does not count as dc), then *into the ch2sp dc 3. In the next ch2sp, hdc 3. In the next ch2sp, dc 3. In the next ch2sp, tc 3, ch 2, tc 3*
repeat from * to * in step 11 until you've gone all the way around, then slst into the top of your first dc. cut your yarn & pull through the loop, and you're done!
Shorthand for the square
ch 4, slst into first ch, ch 2 (counts as first dc), dc 15 into center (16 sts)
slst into first dc w/ color 2, ch 2, puff stitch + ch 1 into every stitch (16 puff sts)
slst into top of 1st puff stitch w/ color 3. ch2, dc4tog into each ch1sp, slst into first dc4tog with color 4
ch 2, *(dc 3), (hdc 3), (dc 3), (tc 3, ch 2, tc 3)* into each ch2sp (each group going into a ch2sp is represented by parentheses)
repeat from * to * then slst into first dc & finish the square
You now know how to make the starburst granny square!
Now, refer back to the number of squares you’re making for your particular circumference and add one for the square on top. Complete that many squares.
Step 3: Assembly
The hat has a basic construction pattern: a ring of squares for the sides of the hat, and one larger square on top, with the brim crocheted on. I use whipstitch to sew.
The Ring
We will be attaching our squares into a long row to form the sides of the hat. If you don’t have to add any dc to the sides of your squares beforehand, go ahead and stitch them together!
To add a row of dc to the side of your square, attach your yarn to the second ch of one of the ch-2 spaces. Insert your hook into that ch, draw up a loop, then ch 2. Dc in each st down the side. Place your last dc in the first ch of the next ch-2 space.
If you’re adding one row: Cut a length of yarn approx. 9” long (23cm) and fasten off.
If you’re adding another row: Ch 2 and turn, dc in each st down the row. Cut a length of yarn approx. 9” long (23cm) and fasten off.
Repeat for as many squares & rows of dc as you need to meet the circumference you determined in “Determining Your Size.”
Sew the squares together into one long row with the added rows all facing left.
Join together the short ends of this row to form a ring. With your squares facing the right side out, attach the yarn to any st. Insert your hook into that st, pull up a loop, and ch 1. Into the same st, sc, then sc in each st around the side. Work 2 sc into the side of each row of dc. Once you’ve worked your way around, slst into your first sc and fasten off. Count the number of sc you’ve created in this row and write it down.
The Big Square
We will be trying to match the stitch count of the row of sc on the ring by adding rounds of dc to our final square. The square has 68 sts (17 sts on each side) with no added rounds. The first round will bring it to 84 sts (21 on each side), and the second will bring it to 100 (25 on each side). If adding only one round is closer to your stitch count, only do one; if adding another is closer, complete two.
With your final square, attach your yarn on any st on one of the sides.
Row 1: Ch 2 (counts as first dc) and work a dc in each st around. Work (2 dc, ch 2, 2 dc) in each ch-2 space from the previous round. Once you work all the way around, slst into the top of your chain 2.
Row 2: Repeat row 1.
Fasten off.
Attaching the Square
On the sc row of your ring of squares, place 4 stitch markers spaced evenly apart. Note: It’s okay if there isn’t the exact same number of sts between each stitch marker; I had 95 sts total, so (not counting the stitch marker) I had 23, 23, 23, and 22 sts inbetween the markers.
Our goal is attaching the big square to the ring of squares, with all 4 sides of the big square attached to all 4 sides of the ring, as defined by the stitch markers.
With the wrong sides facing out, line up a corner of the big square and one of the stitch markers. Attach a length of yarn to the stitch that the stitch marker is in, then insert your hook into that stitch, then into the first st on the big square’s corner (the first ch in the ch-2). Pull the yarn through both stitches.
Insert your hook into the next st to the left on the ring, then the next st to the left on the square, then pull the yarn through both sts. Repeat this down the length of the square and ring until you’ve reached the next stitch marker on the ring, then repeat around the entire circumference and double knot to fasten off.
Note 1: Stitch both chs of the ch-2 from the big square into the stitch markers.
Note 2: If the number of stitches on the side of the big square and in between the stitch markers don’t match up, you’ll have to do some finagling. For example, say you have three more stitches on the big square’s side than the ring’s side (in between the stitch markers). Three times on that side, you will reinsert your hook into a stitch you’ve just whipstitched into on the ring, then insert it into the next new stitch on the big square, then pull through as normal. Space these three repeats out throughout the side to avoid bunching.
The same principle applies if you have more stitches on the ring than the big square. Insert your hook into the next new st on the ring, then into the same st you whipstitched into just prior on the big square, then pull through as normal.
The Brim
Congrats, you’re almost done! Now, on the open edge of the ring, attach your yarn to any st. Insert your hook into this st and pull up a loop.
Round 1: Ch 2 (counts as first dc here and throughout), dc in the same st. Place 2 dc into each st around. Place 4 dc into the side of each row of dc. Once you’ve worked all the way around, slst into the top of the ch 2.
Round 2: Ch 2. Work *(2 dc) in next st, dc in next.* Repeat from * to * all the way around, then slst into the top of the ch 2.
Round 3: Ch 2, work dc into each st around. Slst into the ch 2 and fasten off.
Note: If you want a wider brim, repeat round 3.
Fold the brim back and forth along the edge until it ripples in the way you want.
Weave in any loose ends you may have, and congratulations! You’ve finished the hat.
THE ACCESSORY HOLDER
The Squares
This one’s a lot quicker than the hat! Make 4 starburst squares (see Step 2 of The Bucket Hat).
Assembly
With the wrong sides facing out, stitch together two squares along one side. Repeat with the other two squares.
Line up these two rectangles with the wrong sides out and the short sides on the top and bottom. On the top left corner, insert your hook into the first st on the nearest rectangle (the second ch in the ch 2), then into the first st on the rectangle behind (the first ch on the ch 2), then pull the yarn through and attach it. Reinsert your hook into these two sts, and pull the yarn through again.
Whipstitch down the long side of the rectangle, then the short side, then the other long side. Fasten off, leaving one of the short sides open.
Turn your work inside out so that the right sides of the squares are facing out now.
The Frill
Round 1: Attach your yarn to any st on the open side, pull up a loop, and ch 2 (counts as first st). Dc in each st around, then slst into the first ch 2.
Round 2: Ch 2 and dc into the same st. Place 2 dc into each st around. Slst into the first ch 2 and fasten off.
The Drawstring
Ch 50. Into the second ch from hook, sc. Place 3 dc into the next ch. Sc in next ch, then slst into next ch and fasten off.
Starting on one side of the accessory holder, using the side of the ch that doesn’t have the dc on the end, weave the belt in and out between each dc from round 1 of the frill; you’ll be going over and under the posts of dc.
When you’ve gone all the way around, take the two ends you created from creating the ch and fastening off and double knot them together. Weave both ends into the dc and sc sts you made.
Weave in any loose ends you may have, and congratulations! You’ve finished the accessory holder – perfect for your phone, sunglasses, a small water bottle, or anything else you want to carry around.
THE CAT HAT
This one will probably take you less than an hour to make. You will need 1 yard (1m) of color 2, 2 yards (2m) of color 3, and 35 (32m) yards of color 4. Let’s begin!
With color 2, make a magic ring (tutorial here).
Round 1: Ch 3 (counts as first dc), then dc 7 more into the ring (8 sts total). Tighten to close, then with color 3, slst into the top of the initial ch 3.
Round 2: Ch 2 (counts as first dc here and throughout), then place (2 dc) into the top of the initial ch 3. In the next 3 sts, work (2 dc). (3 dc) in next st, then (2 dc) in next 2 sts, then (3 dc) in final st. With color 4, slst into the top of the initial ch 3.
Round 3: Ch 1. Work an sc into the same st, then (2 sc) in next st. Repeat sc, (2 sc) around. Slst into initial sc.
Round 4: Ch 2, then dc in next 4 sts. Ch 10, then skip the next 7 sts and work a dc in the eighth. Dc in next 6 sts, then repeat from to . Dc in final sts, then slst into the top of the initial ch 2.
Round 5: Ch 1, then sc in each st around. Into the ch-10 spaces, place 13 sc – don’t work into the individual chs. Slst into the top of the initial sc.
Round 6: Ch 2, then work (3 dc) into each st around. This gives us the wavy brim. Slst into the top of the initial ch 2.
Round 7: Ch 2, then work dc in each st around. Slst into the top of the initial ch 2 and fasten off.
To add the chin straps, first identify the middle of each set of 13 sc from round 5. Attach your yarn to the bottom of this edge, then insert your hook, pull up a loop, and ch 19. Cut the yarn and pull through, then trim the edge; you don’t have to sew in this end. Repeat on the other side.
Weave in your ends, and you’re all done!
If you’ve made it this far, thank you so much for reading all this! I hope it’s given you all the info you need on the Sunny Days Set pattern. If you have any more questions, please feel free to contact me at sspstitches@gmail.com!
Find the PDF pattern with step-by-step images in these places:
Lion Brand (kit including all the yarn you need + free PDF pattern)
You can find my pattern book, Crochet Retro Blankets in One Week: 40 Beginner-Friendly Projects for Cozy Throws & Matching Pillows, on the shelves of all major retailers — or see your purchasing options (US + international) here!